DIY Damp Treatment: Essential Steps Before Painting
June 17, 2024
Treating damp walls isn’t just about improving their appearance; it’s crucial for preventing future damage to your home.
In this guide, Anke Damp Proofing will help you on how to tackle dampness effectively before painting.
Keep reading for all you need to know!
Key Takeaways
- To fix damp walls, first find where the moisture is coming from. It could be cracks, leaking pipes or poor ventilation.
- Clean any mould with a special spray and scrub it off. Then, repair cracks and holes in the wall.
- Sand and wash walls before applying a waterproof seal to keep them dry.
- Pick paint that stops moisture and has chemicals to kill mould for painting damp walls.
- Keep your house dry by using dehumidifiers, fixing leaks quickly, and ensuring your home is well aired out.
Understanding the Causes of Dampness – Causes of dampness include water ingress through walls and roofs. These can result in rising damp and penetrating dampness, leading to mould growth and structural damage.
Identifying the Source of Moisture
To treat damp walls correctly, first, find out where the moisture comes from. Moisture can seep through cracks in bricks or at points where window frames meet walls. It might also rise up from the ground if a house lacks a proper damp-proof course.
Look for signs like peeling paint, musty smells, or visible watermarks.
After pinpointing these areas, check for more hidden sources of dampness such as leaking pipes inside walls or poor ventilation leading to condensation. Solving these issues is key before moving on to fix the damage and start painting.
Common causes of dampness
Understanding why walls get damp is vital before we tackle the issue. Condensation, rising damp, and penetrating dampness are primary reasons for moisture in walls. Each cause has its own way of invading our homes.
Condensation occurs when warm air hits cold surfaces, creating water droplets that soak into walls. Rising dampness happens due to moisture from the ground travelling up through bricks and mortar, a problem often seen in older houses without a proper waterproof membrane or damp-proof course.
Penetrating damp is caused by water leaking through weaknesses in the building’s exterior, such as faulty roofing or unsealed windows and doors.
Leaks from plumbing can also lead to wet walls inside the house. Broken pipes or failings in waterproofing around bathtubs and showers are common culprits of internal dampness. External factors like damaged brickwork allow rainwater direct access to the interior of your home causing further issues with moisture penetration.
Ensuring your home has an effective waterproof seal and addressing any cracks or holes promptly will help keep it dry and ready for painting.
Assessing the Severity of Dampness
Signs of dampness
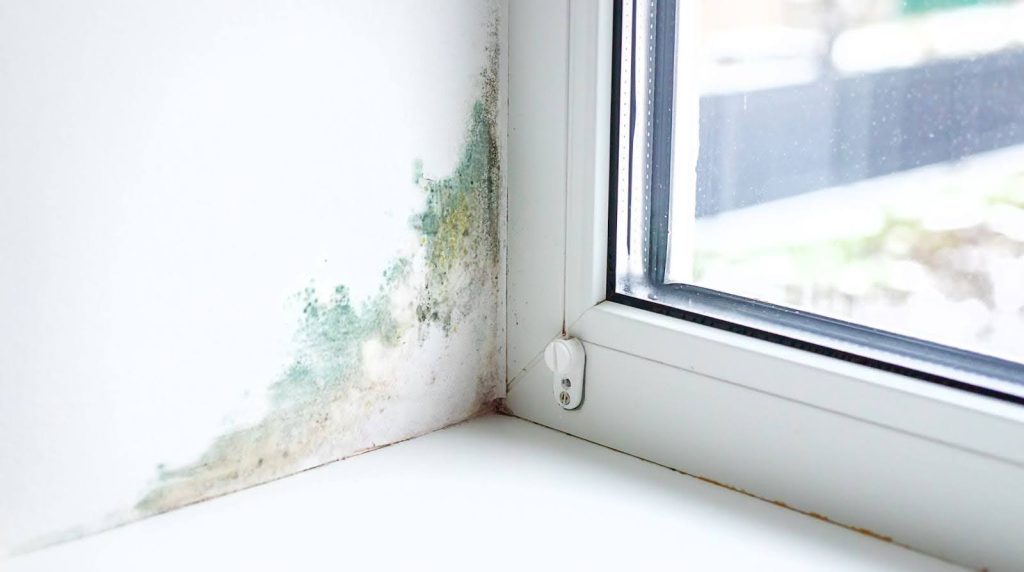
Peeling paint, watermarks, and a damp smell are clear signs of dampness on your walls. You might also see mould spots or feel moisture when you touch the wall. These signals warn that water is getting into your home.
Mould is not just ugly but can harm your health.
Next, spotting dark patches or seeing wallpaper come loose means damp has set in deep. Damp causes materials to break down over time, leading to problems like dry rot in the wooden features of the house.
Now it’s key to identify the type of mould and tackle it before any painting begins.
Identifying mould and mildew
Mould and mildew show up as black, green, or white patches on damp walls. They thrive in wet areas and can cause hay fever or other allergies. To spot them, look for discoloured spots or a musty smell in rooms like basements.
These signs mean you need to treat the area before painting.
To reduce mould and mildew, use a mould remover spray and a sponge. Spray the affected spots thoroughly. Then scrub with the sponge to remove all mould spores. This step is crucial for preparing your walls for a fresh coat of paint and ensuring a clean finish.
Treating Dampness Before Painting
Remove mould and mildew, repair cracks, and holes and sand the walls before applying a waterproof seal. Then, choose the right paint and use proper application techniques for painting damp walls.
Removing mould and mildew
To get rid of mould and mildew, start by cleaning the affected areas with a solution specifically made for killing these fungi. It’s crucial to wear protective gear like gloves and masks during this process to prevent inhaling harmful spores.
After applying the solution, scrub the surfaces thoroughly until all signs of mould and mildew disappear. This step ensures that your walls are clean and smooth, ready for the next stages of preparation before painting.
Once you’ve successfully removed all traces of mould and mildew, let the area dry completely. Using a dehumidifier can speed up this process by pulling excess moisture from the air, creating an environment where mould struggles to grow back.
A perfectly dry wall is essential before moving on to repairing any cracks or holes, sanding down uneven spots, washing walls with soap and water, and finally applying a waterproof sealant as advised.
This comprehensive approach prepares your walls for painting and helps prevent future issues with dampness and fungal growth.
Repairing cracks and holes
First, gather tools like plaster patches, a sander, and a paint scraper. Fill every crack and hole with plaster patches. This step makes sure the wall is smooth and ready for painting.
Next, grab sandpaper to smooth down the filled areas. Apply a waterproof seal over them. This action stops dampness from spoiling your hard work in the future.
Sanding and washing the walls
Once the walls are repaired, the next step is sanding and washing them. Sanding helps to remove any loose paint and smooth out rough areas. It’s crucial for making sure the surface is ready for a fresh coat of paint.
Use fine-grit sandpaper and gently work over the entire wall surface.
Washing comes after sanding. This process removes dirt, grime, and any mould that might be on your walls. Washing ensures you have a clean base before applying waterproof sealant or damp proof courses.
Always let the walls dry thoroughly before moving to the next step of sealing them against future dampness. This preparation makes sure that new paint adheres well and looks great for years to come.
Applying a waterproof seal
To apply a waterproof seal, use specific materials such as sealant and damp seal paint. Ensure thorough and careful application to cover all areas of the damp walls. Applying a waterproof seal is crucial in creating a barrier between the walls and paint, providing long-term protection against dampness.
Hiring a professional like Anke Damp can ensure correct and effective application for peace of mind.
Tips for Painting Damp Walls
Choosing the right paint
When selecting paint for damp walls, opt for a specialised damp seal paint designed to withstand moisture. Waterproof emulsions are ineffective in this scenario. Professional painters have the expertise to advise on the correct paint selection for damp walls.
Proper application techniques
To achieve a successful paint finish on damp walls, start with using plaster patches to fill cracks and holes. Sand the area smooth for an even surface before washing away any residue.
Apply a waterproof sealant to prevent future dampness from seeping through, then choose an appropriate paint that is specifically formulated for damp areas. Ensure the walls have dried out for about a week after treating the underlying cause of damp before painting.
After addressing the source of moisture, it’s crucial to utilise a mould remover spray and sponge to remove any existing stains. This step-by-step technique including repair, preparation, sealing and painting ensures a long-lasting solution against recurring damp issues.
Preventing future dampness
Also, ensure proper ventilation by opening windows and using fans to reduce moisture buildup. Additionally, identify and address any sources of water leaks or seepage to halt the potential for future damp problems.
Regularly monitor the humidity levels in your home and take action if they exceed recommended levels. Finally, maintain a clean environment by routinely cleaning gutters and downspouts and promptly addressing any water damage.
Contact Anke Damp Today For Treating Damp
In conclusion, treating damp before painting is crucial to prevent future issues. The practical strategies discussed are easy to implement and efficient. Emphasising the importance of these approaches will lead to significant improvements in your home.
Contact Anke Damp for all your damp issues and leave it to the experts.
Get in touch
Opening Hours
Monday to Friday:
8:00AM – 5:00PM